Friday, February 27, 2015

Balloon party! {for lawn fawn}

balloon party! {for lawn fawn}

I love paper balloons much more than real balloons. My kids always fight over real balloons and that's a bummer.

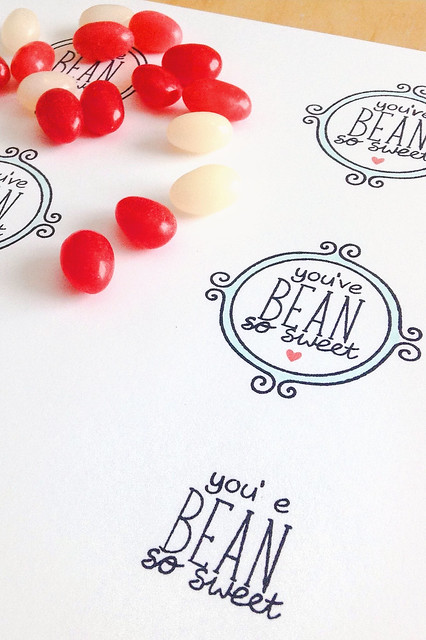
These new balloon die-cuts from Lawn Fawn are so much more fun. I wanted to show you how you can create fun party decor quickly and easily using the dies, some ink and a sponge:

balloon party! {for lawn fawn}


We had a casual "just come over for cake" party to combine my birthday and my niece's. My pregnant sister said she was too tired to bake anything, so I volunteered. But it's kind of weird to spend too much time on decor for your own birthday, isn't it...

balloon party! {for lawn fawn}


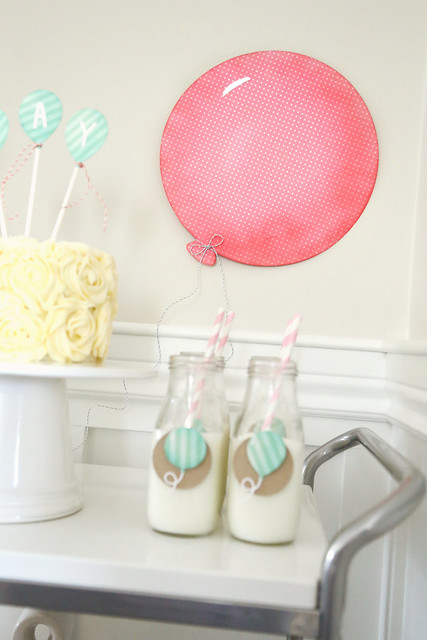
Instead of a banner, I opted for a big balloon, cut with my silhouette into a 12x12 lawn fawn polka dot paper.  I sponged the edges with the matching ink - I am LOVING that Lawn Fawn has matching inks now!

balloon party! {for lawn fawn}


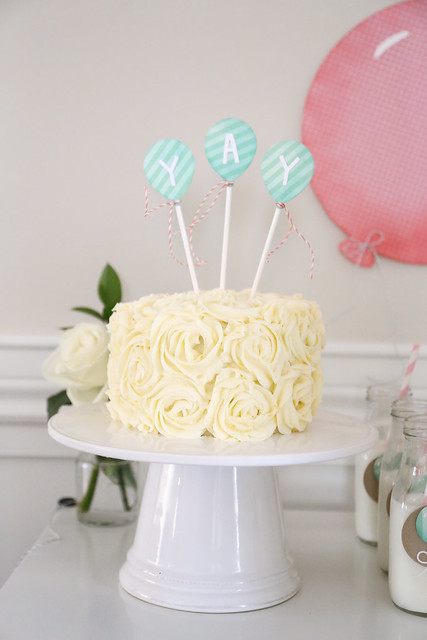
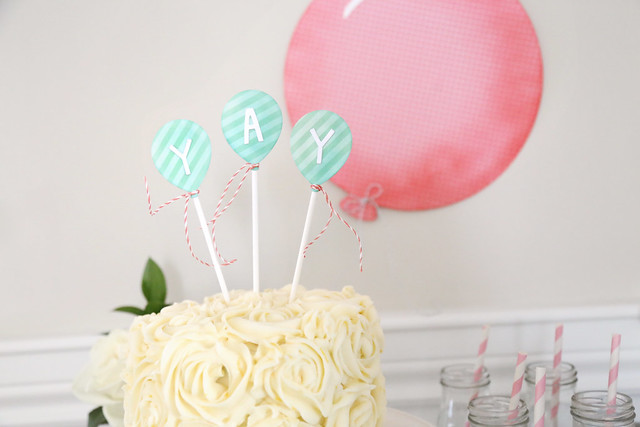
Everything party needs a cake. I baked a lemon pound cake, and tried my hand at fancy rose icing with a lemon buttercream. It was all good. so good. The cake toppers are so simple to make! Some alphabet die-cuts, and more paper balloons.  You can easily create a personalized party cake if you wanted to.

balloon party! {for lawn fawn}

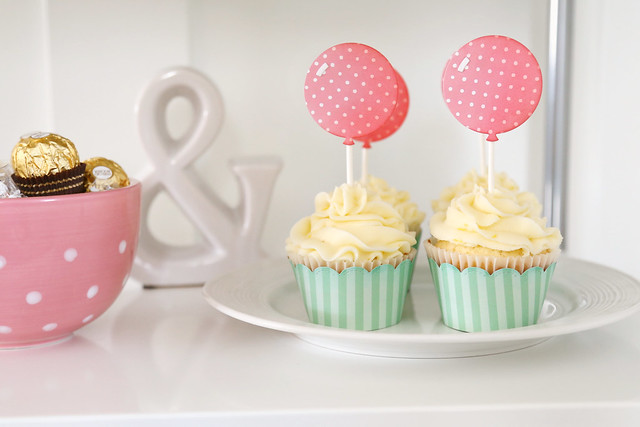
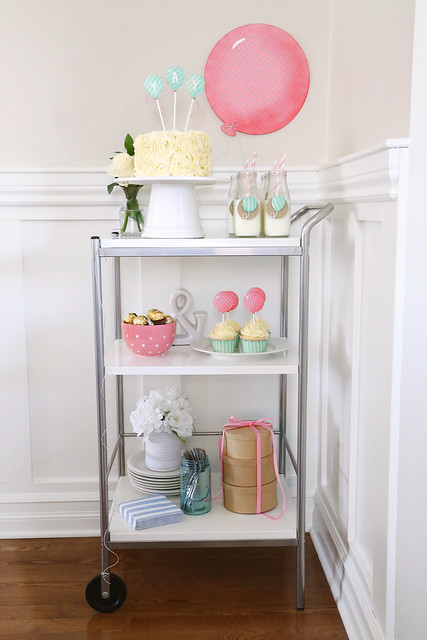
Because I baked my cake into 6" pans, I had enough leftover batter to make a half-dozen cupcakes. I love that, because it requires no extra effort to make the party cart look more festive and full.  More balloons here, and fun cupcake wrappers too. It makes such a difference to sponge the edges of the dies! It gives extra dimension and really shows off that they were created by hand.

balloon party! {for lawn fawn}


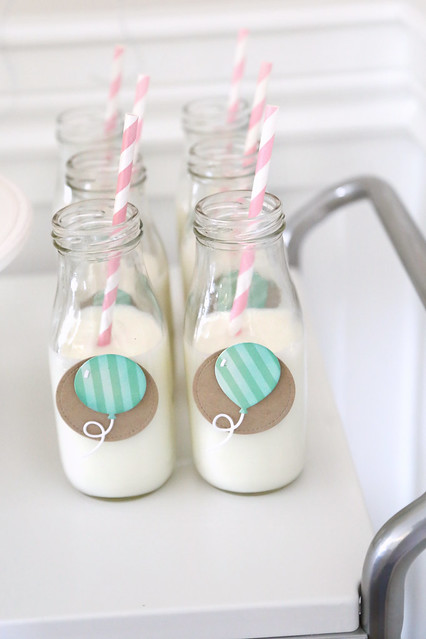
I can't eat cake without craving milk, and it was easy to dress up the milk bottles using the same balloon dies, backed with a simple kraft circle.  The straws help reinforce the party colors for a very cohesive look.

I hope you've enjoyed this simple party set-up, and that it inspires you to create your own party decor!

balloon party! {for lawn fawn}

♥.

Monday, February 23, 2015

Cherish the moment {mama elephant}

Good Monday morning! I'm here with a new Bear Hugs card for you:

cherish the moment {mama elephant}


I started out with a piece of white cardstock and a paintbrush. I painted on a blue sky with watercolors. It's imperfect and just the look I was going for.

Into the sky, I die-cut a moon (from the stitched sky die set) and backed it in vellum that I colored with a yellow marker.  I then added a spattering of stars, and dusted some glitter onto each one.

The bears just look like they are sitting together looking up at a night sky, don't they?

cherish the moment {mama elephant}

I colored the bears in a deep brown, to make sure that they stood out from everything else. They are too sweet for words.  I thought the sentiment, from Bloomsies, worked perfectly here. I stamped it on a banner , which I then cut so that it would appear longer.  I hid the cut edges behind the bears.

I hope you like it!

♥.

Friday, February 20, 2015

so sorry {mama elephant stamp highlight}

Hi there and welcome to the last day of Mama Elephant's February release stamp highlights. Even though we're showing off Zenith Borders, I had to sneak in another card using the kitty from Three Amigos.

so sorry {mama elephant stamp highlight}


hee hee. this just makes me giggle.

He wasted so much paper trying to come up with the right words to say how sorry he is.  I love the little tears falling onto his flushed cheeks.

I don't normally find sadness so cute... fyi.

I stamped the background with one of the Zenith Border strips, and before the Mama Elephant ink could dry, I took a finger (I'm just fancy like that) and smudged the design so it looked more tone-on-tone. Bonus: it helped the ink to dry faster so I could finish the card.

so sorry {mama elephant stamp highlight}

I love that it looks like wallpaper behind the sorry little dude.

Check out what the rest of the design team has cooked up - click!

♥.

Thursday, February 19, 2015

Freestyle Florals {mama elephant stamp highlight}

I can't tell a lie. If you pass by my blog, you know I'm more of a cute-image-lover, rather than a classy-floral-stamp-kind-of-gal.

When I got my Mama Elephant box this month, I went gaga for Bear Hugs and Three Amigos, and nodded appreciatively at Zenith Borders. But Freestyle Florals? I think I rolled my eyes and thought: not another flower stamp set.

Don't be mad, Kryssi & Angela. hee hee.

When I started playing with it, I kind of fell in love. It's fresh and whimsical, because of the hand-drawn nature, and looks beautiful colored or not.

freestyle florals {mama elephant stamp highlight}

I decided to do some masking and have the florals frame out a sentiment (taken from Bear Hugs.)  I gave the flowers a subtle wash of blue and stamped the sentiment in colors that matched.

It all looks like a piece of stationery to me, something you'd buy at a paper shop.  I love it.

freestyle florals {mama elephant stamp highlight}

I hope you like it too! Click over to the ME blog to see what the rest of the girls came up with.

♥.

Wednesday, February 18, 2015

Stacked amigos {mama elephant stamp highlight}

Hi there! This is my second post today. Scroll down or click *here* to see my lawn fawn inspiration week card.

The Mama Elephant team is showing off the insanely hilarious new stamp set, Three Amigos.  I already made my stampede card using them (click!) and today I stacked them for a different look.

3 amigos {mama elephant stamp highlight}


It's just so easy to come up with an adorable card using these critters! I created stripes on the card base using my ruler and copic marker. I like that they look a little imperfect and a touch water-colored.

Then, I stacked 'em.

3 amigos {mama elephant stamp highlight}

Each critter is grounded by way of the stitching line die (found in the Sew Fancy die set.)

Side note: as I was coloring the raccoon, I added so much dark to his mask area that I couldn't see his eyes anymore! My solution? Dot a colorless copic marker to remove some of the color around his eyes. What do you think?

3 amigos {mama elephant stamp highlight}

On the left side of the card, I stacked 2 borders (from this die set), coloring one of them to match the stripes on the card-base.

I hope you like it! Check out the ME blog this morning to see what the rest of the design did with the amigos!

♥.

baked with love {lawn fawn inspiration week}

Hi there and welcome back to another day of Lawn Fawn inspiration. Today, we're showing off my favorite set of the entire new release:  baked with love.

Can you resist a smiley-faced bag of flour? Can you?


baked with love {lawn fawn inspiration week}


I did some masking to be able to cuddle them all in so close, and then added some blue shading around them. I used a dauber and lawn fawn's new Mermaid ink.

After the coloring was all done, I curved the sentiment above and added the little heart.

On the card base, I felt like it needed a little pop to frame out the images, so I grabbed a ruler and a red copic marker and drew in a stripe at the top and bottom.

I hope you like it!

I'll be back in a few hours with another Mama Elephant card!

♥.

Tuesday, February 17, 2015

Bear hugs! {mama elephant stamp highlight}

Hi, and welcome to the first day of Mama Elephant's February release stamp highlights. We're showing off our best bear hugs today.

I have to be honest: when I saw the artwork for this set, I was beside myself. It has a lovely storybook feel to it, and I must have emailed Angela at least 3 times to tell her how much I loved them. They are the sweetest little bears I have ever seen!

bear hugs! {mama elephant stamp highlight}


I tried to bring out that storybook vibe I was getting from the images. I went with a muted palette, and added the banner and leafy sprigs to frame out the image. They add a touch of whimsy to the bears, don't you think?

bear hugs! {mama elephant stamp highlight}

I sponged yellow and soft brown inks on the background panel... just a touch of sun shining down on them...

The scallop borders framing the white panel on either side is actually the hearts border die... just tuck it in there for a completely different look!

I hope you like it! There's more of these cute bears on the ME blog this morning - click!

♥.

Monday, February 16, 2015

Lawnscaping celebrates 100 challenges! {guest designing}

Ah, I'm so happy to be back in my old stomping grounds over at Lawnscaping! I am helping them celebrate their 100th challenge, as Yainea's special "plus one" guest.


For the occasion, I made a critter-filled birthday card:

lawnscaping celebrates a birthday!

The scene is a one-layer deal. You might think that I did an insane amount of masking to achieve the look, but you would be mistaken. ha.

The only thing that I masked was the long, swirly, happy birthday sentiment (from the new Scripty Sayings.) The rest involved me wiping ink off of key areas (like the top of the Gleeful Gardens bird's head, or the top of the sunflower) before stamping down. I filled in lines that were missing with a copic pen after the fact.

so. much. easier.

Check out the Lawnscaping blog today, and my good friend Yainea's blog. I am so excited to have been invited to celebrate with them today!

There are prizes to be won, so click on those links for more details!


♥.

to my significant otter {lawn fawn inspiration week}

Hi there! Welcome back to another day of Lawn Fawn's February inspiration week! Today, we're showing off the amazing Flirty Frames.

When Kelly sneaked a photo of this set to the design team, we all squealed. At least, I'm assuming they did. Was that just me? I love this set full 'o frames.

It's perfect for making your focal image stand out a little more:

my significant otter {lawn fawn inspiration week}


Are you groaning? Haha. I can't help myself. I gave this one to the hubs on Valentine's Day. My daughter stared at it for a solid minute before muttering "I don't get it."

I spent the next 5 minutes telling her what the joke was. All of a sudden, with a 9 year old sneering at you, it's less funny. bah.

I thought it was cute.

And I wasted a few sheets of paper trying to get that sentiment to look right. But I love it.

I hope you do too!

Check out the Lawn Fawn blog for the (less punny) design team creations - click!

♥.

Sunday, February 15, 2015

Mama Elephant February Stampede!


Welcome to the Mama Elephant Release Design Team blog hop!

The newest release is now live and available for purchase in the store!

www.mamaelephant.com


Mama Elephant February Stampede!

I made a birthday card with the super cute new set, Three Amigos.  It doesn't get more hilarious than this, and the possibilities are endless!

I colored and die-cut the adorable critters, and gave them a balloon and party hat for the occasion.  The blue background was created using the new set, Zenith Borders.

Mama Elephant February Stampede!


To celebrate the new release, Mama Elephant is picking 3 winners to win their choice of stamp set! Winners will be chosen at random from the collective blogs in the Stampede. You have up to 3 chances to qualify to win!

» 1. Leave a comment on this blog post «
» 2. Like/share us on Facebook: facebook.com/mamaelephant «
» 3. Follow/tweet us on Twitter: twitter.com/heymamaelephant «

Each action qualifies for one entry, max 3 entries per stampeder please!


Mama Elephant February Stampede!

Now let's get on with the Stampede!


Earresistible! {lawn fawn inspiration week}

Hi there, and welcome back to another day of Lawn Fawn's February inspiration week. Today, we're showing off the Easter-themed set, "Eggstra Special Easter."

Earresistible! {lawn fawn inspiration week}


I love the bunny with the bite taken out of his ear!

I want to make a sort of wreath around him, so I bent the tulips and framed it out at the top and bottom with the sentiment.

To fill in the gaps at the top, I found the little squiggly line image in the new "Flirty Frames" set. perfect!

Earresistible! {lawn fawn inspiration week}

He looks so chocolately.... mmmm....

I kept the colors springtime-fresh, with the yellow gingham background. I can't stop using the new "Gingham Backdrops" set. It lines up so easily!

There's more to see on the Lawn Fawn blog this morning - click!

Saturday, February 14, 2015

Lawn Fawn inspiration week: you've been sweet.

Happy Valentine's day!

Right on cue, the Lawn Fawn team is showing off the new candy box die, and I'm showing off the class valentines that Maia handed out at preschool yesterday:

you've been sweet.

These candy boxes are the sweetest. I can't wait to decorate them for Easter, and I'm already seeing them decked out for next Christmas. They are so easy to put together! I love that.


you've been sweet.


I made a sheet full of tags, and with very little to color, it went quickly. When you want to make a custom sentiment, you'll do what I did: scour every set, only to be disappointed that none of them include a "you've."

BUT, wipe the "r" out of "you're" and you have a space to write the "v" in with a copic pen. There's always a way to make it work!

you've been sweet.

Visit the Lawn Fawn blog this morning for more inspiration - click!

♥.

Friday, February 13, 2015

lawn fawn's february inspiration week begins!

It's finally here! Lawn Fawn's Spring Release will be for sale when this month's inspiration week wraps up - woot!

Today's showcase features "Gleeful Gardens," a super adorable garden-themed set which includes those smiling mushrooms.

I made this card last month, for Lawn Fawn's CHA week. The original post could be seen *here.*


I still love the gingham background that sets off the little garden scene!

And don't forget to visit the lawn fawn blog this morning to see what the rest of the design team has come up with - click!

I'll be back tomorrow with a brand-new project!

♥.

Monday, February 9, 2015

New home dreaming: bedrooms

In case you missed it, we're moving in the spring!

We'll be removing wallpaper and updating flooring, but I'll have to be creative with our budget to get the look I want in all of the rooms.

For today, let's talk master bedroom.

We've had the same Ikea bed for almost 15 (it was mine when I moved out before we got married.)


If you look at the footboard, you could see where the dog chewed - erm, actually the kids - had their way with it.

Our bedroom has never gotten a makeover, in the 10 years we've been living in this home. It's so basic and boring.

Most of all, I just want a grown-up bed.

After browsing some furniture stores and seeing the beds I want with price tags over a thousand, I switched gears and bought a sleigh bed secondhand, for 150$.

The look of a painted sleigh bed is so beautiful:

In white,

source

or putty-colored,

source
or even in grey,

source

What do you think?  

We're leaning towards either of the non-white options, because I have in mind to paint out my existing night-tables white.

We are also planning on moving this rug, from our basement up to our bedroom:


It is the gray scroll tile rug from Pottery Barn. The scroll detail lines are a very creamy ivory, almost beige color. I'm dreaming of a bed in a linen color that ties into the rug, and then all white bedding and white bedside tables.

Can you picture it?

For now, it looks like this:


How embarrassing. For how uncluttered the rest of my house is, my friends are always surprised to see the garage. We hide our messy behind garage doors. haha.

We made room for the new bed frame, around the hubby's weight bench, and are filling in nicks and scratches to ready it for painting.

I can't wait to show you the finished bed!

♥.

Monday, February 2, 2015

Superhero tag, for Mama Elephant.

Hi there! I'm here and on the Mama Elephant blog today, featuring an oversized thank you tag... superhero-style.

superhero tag

I love the beautiful script of the new "merci" stamp set, and I love the new superheroes... so I put them together on this SUPER big thank you tag.

I colored and die-cut my superhero pair, but I really wanted the "thank you" sentiment to be the star of the show. I gave it special treatment by stamping it on the tag base and then again onto the die-cut circles (from the new "sew fancy" die set.)  I wanted it to look a bit like a Captain America shield.

What do you think?

superhero tag

The circles are propped up onto foam adhesive squares, and I die-cut a star into the middle, to reveal the sentiment stamped underneath.  It's really easy to do! I put together a quick photo tutorial:

superhero tag

1. Die-cut the tag, and the circle set. Pull apart the 3 circles, and color them as shown.

2. Fit the circles back together, and tape them at the back so that they won't shift around.

3. Stamp "thank you" onto the tag, and again onto the circles, making sure to press down and get the impression to saturate the grooves of the circles.

4. Fit the circles over the tag, and line up the sentiment. You can also die-cut a star into the center, as I did in my project.

I hope you like it!

♥.