Sunday, December 23, 2018

Last minute Christmas

Hi there!

With only 2 more sleeps until Christmas, I'm sneaking in one last card that I made but never blogged.

last minute Christmas

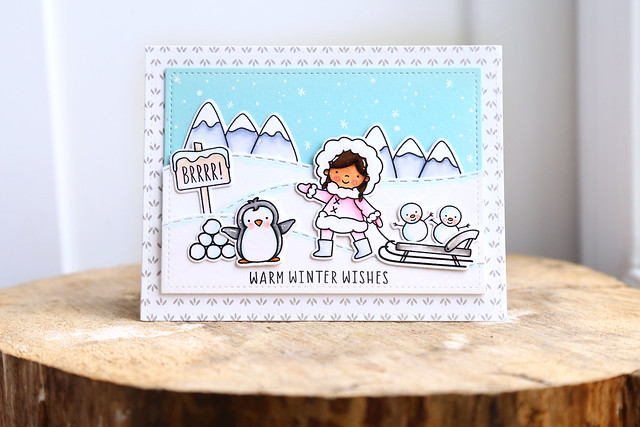
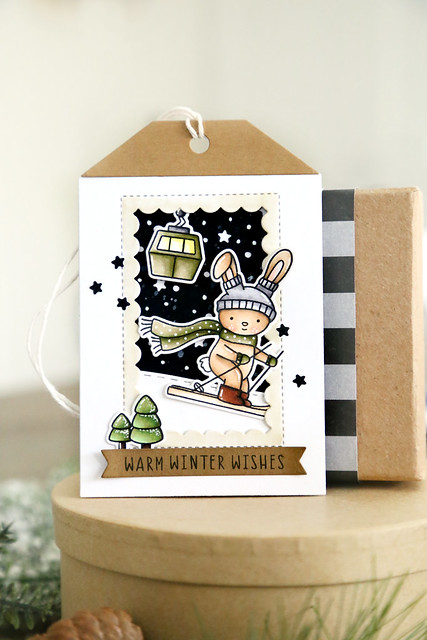
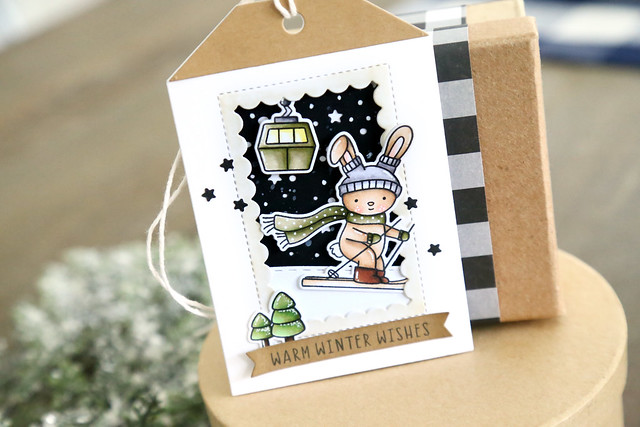
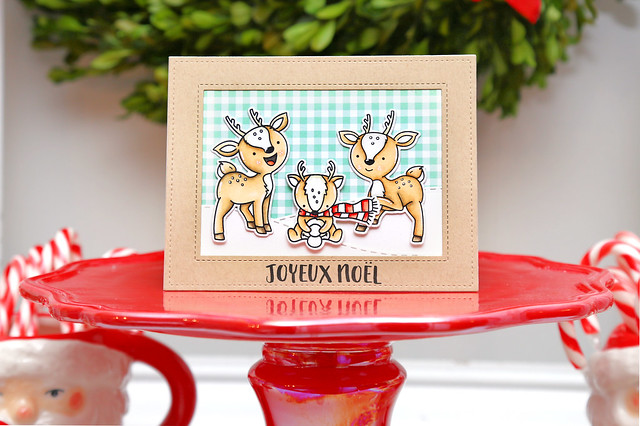
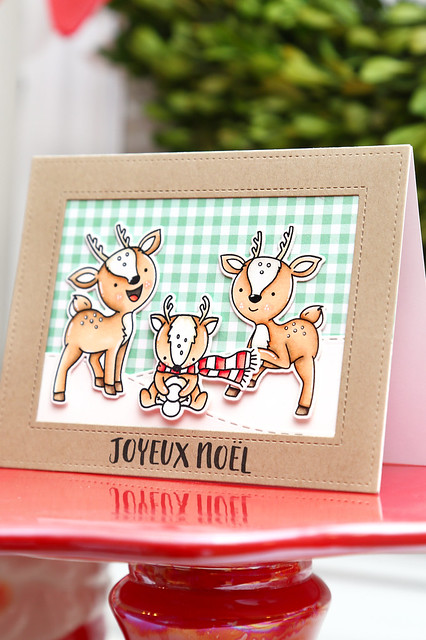
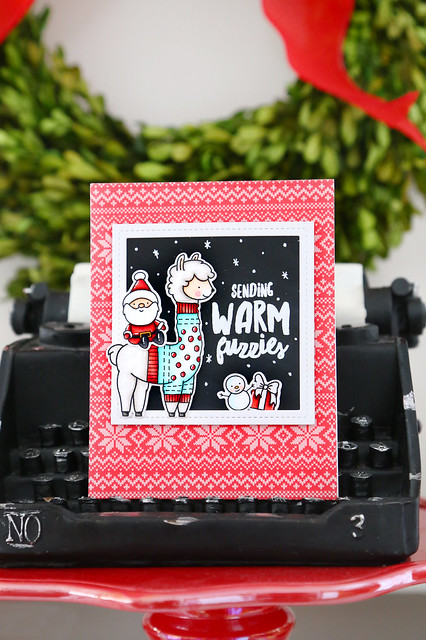
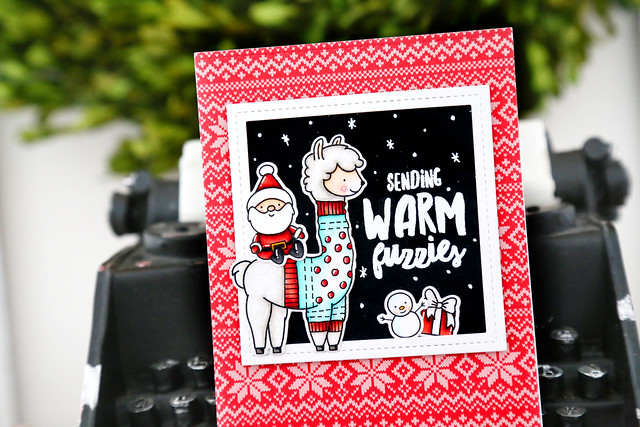
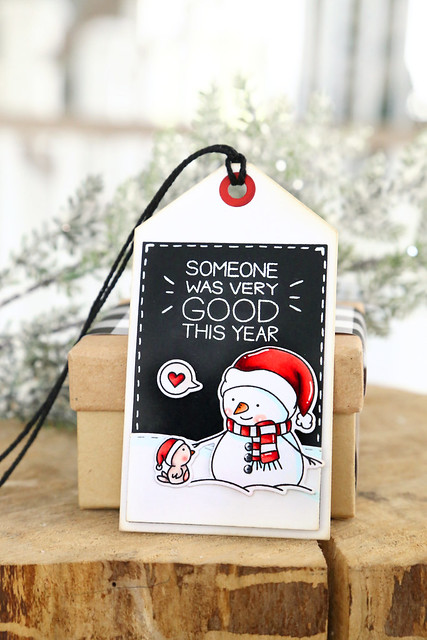
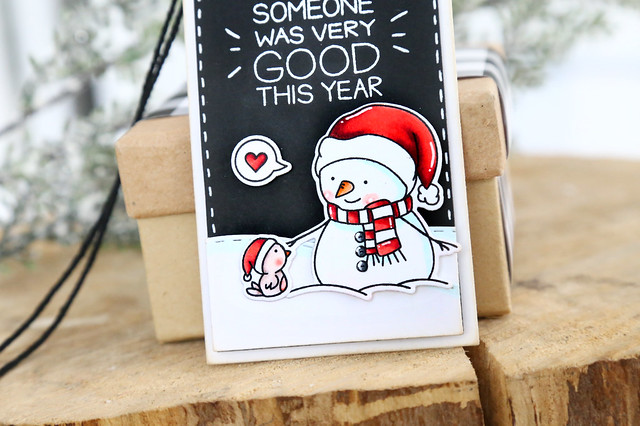
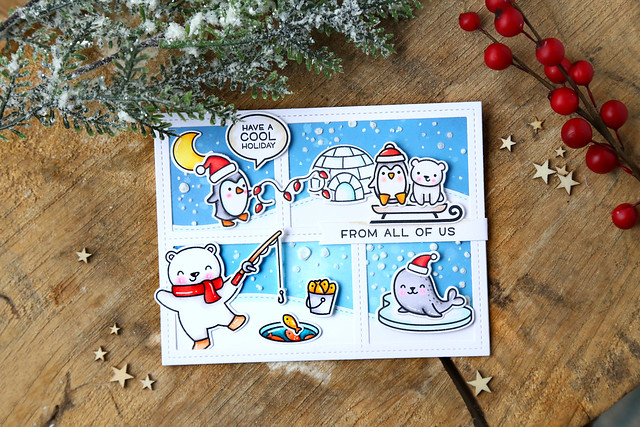
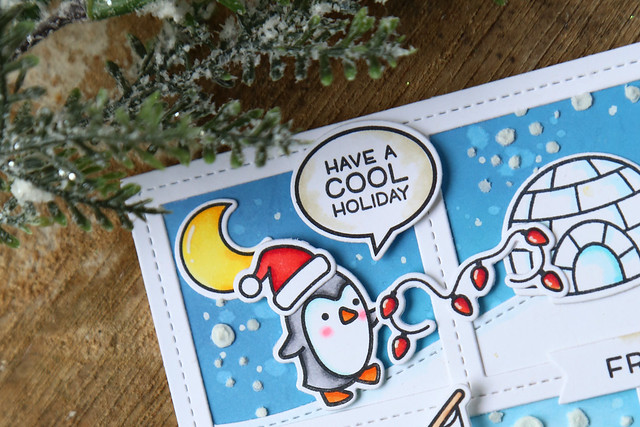
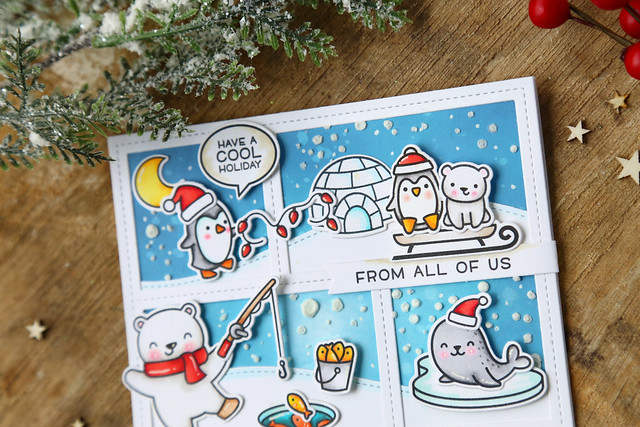
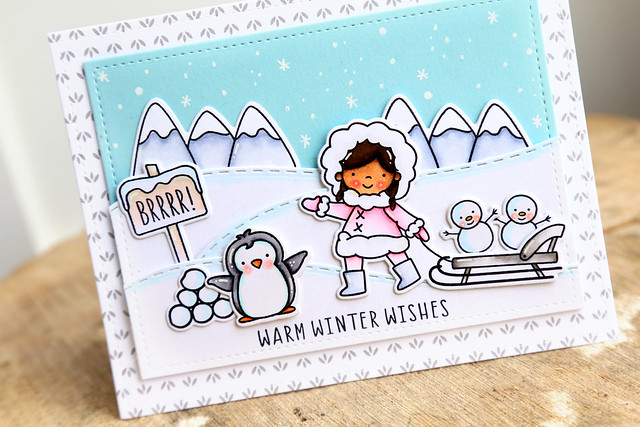
I combined 3 winter sets from Neat and Tangled to create this card: Stay Cool, Snow Fun, and Get Yeti. I love how they all work so well together!

I also used the Stitched Slopes dies to create the rolling snow banks.

last minute Christmas

The 2 mini snowmen in the sled crack me up! Once I colored and created my winter scene, I used a white gel pen to draw in the falling snow in the background.

I hope you like it, and Merry Christmas!

♥.


Saturday, December 22, 2018

Letterboard Christmas tree (Ellen Hutson)

Hi there!

With only a few more sleeps 'til Christmas, I'm gonna try to sneak in a few cards that I made but never blogged yet.

I used the Ellen Hutson Letterboard die set to create this fun card:

letterboard christmas tree (Ellen Hutson)


There is so much online inspiration for letterboard quotes! This one was so clever I had to re-create it. I started out by die-cutting the "felt" part using black cardstock, and the frame out of Lawn Fawn woodgrain paper.  I then die-cut all of the letters I needed and set them up to form (what I hope looks like) a Christmas tree.

letterboard christmas tree (Ellen Hutson)

I added an asterisk star at the top, and put together 3 of the straight lines (from the percentage symbol) to form the base of the tree.

I adhered the letterboard onto a piece of Christmas paper, and added a holly accent (using Lawn Fawn's Woodland Critter Huggers Winter Add-On dies.)

I hope you like it! Thanks for stopping by!

♥.

Monday, December 17, 2018

Elf party (for Lawn Fawn)

Hi there!

Last week, I put together a little hot chocolate night for all of the little cousins, using stamps and dies from Lawn Fawn to decorate.

Elf party (for Lawn Fawn)

We're still using our handmade elf, and he was the star of this show. I made a little sign for him to hold, and stuck him into a Christmas wreath.

Elf party (for Lawn Fawn)

The cutest part of the party decorations was this elf banner! I made it using a mix of dies from Lawn Fawn and stamped the face (from Let's Toast.)

Check out the elf-banner tutorial on the Lawn Fawn blog today - click!

♥.

Tuesday, December 11, 2018

Ellen Hutson's 12 tags of Christmas

Hi there!

I'm thrilled to be joining the line-up of designers for Ellen Hutson, showing off tag ideas with a feminine twist! Each day, the lead designer has chosen a theme. This is what I chose:


It's a bit of a stretch for me, not using blue or red or light, bright green on a Christmas tag, but so fun! This is what I came up with:

12 tags of Christmas


Isn't it cozy-looking? I used kraft and black and different shades of grey to color the tag. And some green, but I did make sure that it was more of a neutral olive tone. All of the images are from Neat and Tangled's Bunny Slopes set, and the sentiment was lifted from Stay Cool.

12 tags of Christmas

I love how the bunny's ear and poles overlap the scalloped rectangle frame, but her skis are tucked in. It's the little things.

Each designer is buddied up with another designer who has to create her own tag using today's theme as her inspiration. My good friend, Miriam Prantner, has made a super cute tag you'll want to check out - CLICK!

♥.

xoxoxo (Lawn Fawn valentine release week)

Hi there!

Welcome back to another day of Lawn Fawn's valentine release week. Today, I'm showing off the XOXOXO line border:

xoxo (Lawn Fawn valentine release week)

I used the line border to ground the 2 musicians from Critter Concert. I back the line border with a solid heart from the new Candy Hearts die collection and peppered the air with music notes and tiny hearts.

xoxo (Lawn Fawn valentine release week)


The sentiment was stamped onto a piece of mint cardstock, which is a pretty contrast to the light purple Polka Heart Backdrop.

I hope you like it! Be sure to check out the Lawn Fawn blog for more inspiration - click!

♥.

Monday, December 10, 2018

Heart treat boxes (Lawn Fawn valentine release week)

Hi there!

Welcome to another day of new products reveals, all part of Lawn Fawn's valentine release week. Today, we're showing off the cutest little Heart Treat Boxes:

heart boxes (Lawn Fawn valentine release week)


I die-cut a little collection of boxes, in pink and gingham pink papers. Then, I used another die set, the Candy Hearts dies, to cut the heart toppers for each one. I love how the heart unfolds to open the box!

heart boxes (Lawn Fawn valentine release week)

It's the perfect size for a chocolate truffle! They are cute and easy to make, and would be perfect for class treats.

Check out the Lawn Fawn blog this morning for more inspiration: click!

♥.

Sunday, December 9, 2018

I love you(calyptus) - Lawn Fawn valentine release week

Hi there!

Welcome to day 2 of Lawn Fawn's valentine release week. Today, we're showing off a mini stamp set, I Love You(calyptus):

I love you(calyptus) - Lawn Fawn valentine release week


I colored the koala and bunch of sprigs. I die-cut the Reverse Stitched Scalloped Circle Window and nestled the koala into the opening, layering the bamboo shoots all around. I then heat-embossed the sentiment onto black cardstock and used that to ground the images.

I love you(calyptus) - Lawn Fawn valentine release week

Underneath the sentiment flag, I used a brand new product you'll see later on this week - the Polka Heart Backdrop.

I hope you like it! Check out the LF blog this morning for more inspiration - click!

♥.

Saturday, December 8, 2018

A toast! (Lawn Fawn valentine release week)

Hi there!

Welcome to the first day of Lawn Fawn's Valentine release week! On December 13th, everything will be available for purchase. Until then, the design team is here to show off the new stamp sets, dies, new cardstock and ink pads.

Today, we're kicking things off with a first look at Let's Toast! It comes with a coordinating die set, as well as an extra die set you can purchase to make the toast really pop up:

A toast! (Lawn Fawn valentine release week)


Start with the one longing, lonely toast.... then, pull the tab upwards, and...
a toast! (Lawn Fawn valentine release week)

Ta da! I just think it is so cute! With the tab pulled up, the toast pops up!

a toast! (Lawn Fawn valentine release week)

I hope you like it! There's so much more to see on the Lawn Fawn blog this morning - click!

♥.

Friday, December 7, 2018

Spellbinders small die of the month

Hi there!

I'm taking a break from Christmas-y cards to show off the new dies from the Spellbinders Small Die of the Month. This month's set of dies is so great for tags and cards alike!

Do you know about the die of the month? It's a subscription that gives you a brand new set of dies in the mail each month. There are different subscription options to check out:

Small Die of the MonthLarge Die of the MonthCard Kit of the Month

Here's my card for today:
Spellbinders small die of the month (guest post)


I started out with a piece of grey cardstock, cut slightly smaller than the white folded card-base. I then layered crisp white sprigs all over the grey layer, and used scissors to trim off wherever they ran off the edges.

Spellbinders small die of the month (guest post)

I then used the birthday Warm Wishes Circle Die to create the focal point for my card. I cut it out of white cardstock, and layered it onto a circle of pink cardstock. I also cut out an ivory scalloped circle to tuck in behind.

I die-cut the flowers 9 times, layering 3 flowers together to create fullness. To add color, I used a light pink copic marker and concentrated the color at the centers of the flowers before adding little gems. I used copic markers to color the leaves a light green, and tucked them in behind the flowers.

I hope you like what I've created today! Thanks for stopping by!

♥.

Tuesday, December 4, 2018

A winter deer family (Neat and Tangled)

Hi there!

I'm here and on the Neat and Tangled blog this morning, with a Christmas card that mixes a few sets to create a family of winter deer:

A winter deer family

Before I start chattering about the card, I would just like to say that thank goodness I treated myself to an external flash for my camera recently! I still prefer to take pictures in nice lighting, but at least I have an alternative now. What do you think?

Back to the card! I started out by stamping out my deer. The mama and papa deer are from Oh Deer, and the little one making a tiny snowman is from Santa's Wonderland. I think they all look so cute together!

I colored them all using my favorite brown copic marker trio: E30, E31, and E34. I went back in and added some W5 in the spots that would be most shaded.

I added rolling snowbanks beneath their hooves, using our Stitched Slopes dies.

A winter deer family

I added a gingham paper sky and popped up the focal images before creating a frame using 2 rectangle dies from Lawn Fawn.

I stamped out the greeting, from Nativity Play to the bottom of the frame using a crisp black ink. I'm so happy to have this french greeting for all of our teacher cards this year! We live right outside the city of Montreal, and our kids are in a french-immersion program.

I hope you like it! Thanks for stopping by!

♥.

Friday, November 23, 2018

EBE favorites blog hop

Hi there!


Ellen Hutson is celebrating 12 years! The design team has gotten together to celebrate, by creating cards with our favorite Essentials by Ellen stamp sets. It was too hard to choose one, so I chose 2:

EBE faves blog hop

I used Plaid Maker to create my background. I stamped the solid block image in black ink onto red cardstock. To create the lighter squares, I first stamped off onto scrap paper before pressing down onto my red card. I usually take more time to make sure the plaid is perfect, but I eyeballed everything here. I wanted it to look homespun and hand-painted. To finish off the plaid, I inked up some stripes in white ink. It looks so cozy!

The focal image snowman is from my other favorite set, Snow Buds. I colored his scarf, hat and mittens to match the background. I dangled his mittens again like I did in *this card.* I love the look!

The only sentiment I needed was from the Neat and Tangled set, Stay Cool. I overlapped the mittens onto the sentiment and adhered them to a kraft-colored circle. I used a white paint pen to color the outside edge of the circle, and dotted little snow flakes to the inside.

I hope you like it!  If you're shopping today, check out Ellen Hutson's Black Friday sale:


♥.

Thursday, November 22, 2018

A sweatered llama

Hi there!

I posted this card to my instagram yesterday, but I thought it would be fun to show you how I made the little sweater for the Neat and Tangled Fa La Llama llama:

A sweatered llama

I started out by inking the llama image, but I wiped off all of the ink for his scarf and saddle detailing. Is it a saddle? dude, I have no idea. But you can see what got stamped on the right. I used a pencil to doodle a sweater design, and then traced over my doodle with a copic-friendly pen (like this one!)

A sweatered llama

I then colored him in using copic markers. I think he is just so sweet! The next step was to use him on a card:

Sending warm fuzzies


I could help but stamp the Santa from Elfs And Their Shelf, and have him ride on the llama's back. I also stamped out the little snowman from Snow Fun, and tucked him behind a gift.

Sending warm fuzzies

The sentiment, from Snow Days, was heat embossed, and I used a white gel pen to add little snowflakes to the background. The whole thing was set against a cozy knit patterned paper (by Lawn Fawn.)

I hope you like it! Thanks for stopping by!

♥.

Wednesday, November 21, 2018

25 days of Christmas Tags (Lawn Fawn)

Hi there!

I'm thrilled to be participating in Tracey Mcneely's 25 Days of Christmas Tags again this year!

There are sponsors for every day of the event, and today's sponsor is Lawn Fawn.

25 days of Christmas tags (Lawn Fawn)

I used a Stitched Circle Tag for my tag base, and created a penguin using Woodland Critter Hugger Dies and the Woodland Critter Hugger Winter Add-Ons dies.

I used the belly die from the Woodland Critter die set to create the body of my penguin, and again the tip of that same belly die to create his belly. The rest is more straightforward! The Santa hat fits perfectly onto his head and the holly-and-berry accent at the top of the tag adds a cute final touch.

25 days of Christmas tags (Lawn Fawn)

I scattered white enamel dots all around to look like falling snow.

I hope you like it! Be sure to visit Tracey's blog this morning for a list of participating designers - click!

♥.

Monday, November 19, 2018

Snowman party (for Lawn Fawn )

Hi there!

I'm here and on the Lawn Fawn blog this morning, with some fun ideas for a Christmas snowman party.

Snowman party (for Lawn Fawn)

It just started snowing here last week, so I am definitely in the mood for all the holiday things!

Snowman party (for Lawn Fawn)

I went with a red and green color scheme - it is so bright and cheerful!

Snowman party (for Lawn Fawn)

The banner was created using the String of Lights dies, and I added glossy accents to each one so they really shine! I strung them up onto some Peppermint Cord. To keep the lights facing forward, I added a loop of twine to each light, securing it in the back with some tape.

Snowman party (for Lawn Fawn)

I created little favor gifts using the Tiny Gift Box die and topped them with red bows using the dies from Gift Box.

Snowman party (for Lawn Fawn)

The green argyle patterned paper is so cozy! And they looks so pretty, all in a row.

Snowman party (for Lawn Fawn)

It's really hard to tell from the photos, but I iced the cake in rows of vertical waves and then threw some clear sanding sugar onto the entire cake. It looks like freshly-fallen snow. It really sparkles!

Snowman party (for Lawn Fawn)


To create the snowmen, I used 2 circle dies and accessories from both Woodland Critter Huggers and Woodland Critter Hugger Winter Add-Ons.

I just think they are adorable! I got the idea from Yainea, who inspired me with her card last week.

Snowman party (for Lawn Fawn)

To dress up the milk bottles, I cut some snowflake patterned paper and wrapped it to cover the bottom half of the bottles. Then, I dangled little mittens from more Peppermint Cord.

Snowman party (for Lawn Fawn)


I used a white gel pen to trace the snowflake pattern on the front of each mitten. It looks like a stitched snowflake!

I hope this starts your wheels turning for your own holiday parties! Thanks for stopping by!

♥.

Sunday, November 18, 2018

25 Days of Christmas Tags (Neat and Tangled)

Hi there!

I'm thrilled to be participating in Tracey Mcneely's 25 Days of Christmas Tags again this year!

There are sponsors for every day of the event, and today's sponsor is Neat and Tangled.

25 days of Christmas tags (Neat and Tangled)

I am loving a red, black and white combo for Christmas this year. The snowman, from Snow Fun, is so cute looking down at his little friend. The little speech bubble with the heart in it is from Oh Deer, and the sentiment is from Christmas Sentiments. I used the Build A Tag die set to create the tag.

25 days of Christmas tags (Neat and Tangled)

I hope you like it! Be sure to visit Tracey's blog this morning for a list of participating designers - click!

♥.

Thursday, November 15, 2018

Lawn Fawn holiday week

Hi there!

Lawn Fawn is hosting "a very fawny holiday week" to give you inspiration for holiday cards and projects. If you missed the first few days, you should definitely check it out on their blog. I'm up today, with a card that pulls from a few different sets:

Lawn Fawn holiday week

I used the Peekaboo Backdrop to frame out little wintery scenes.  I used different holiday sets for the critters, including Toboggan Together, Sealed With A Kiss, and Beary Happy Holidays.

Lawn Fawn holiday week

I added the sentiment and speech bubble from Say What? Christmas Critters.

Lawn Fawn holiday week

After the entire card was assembled, I decided that it was missing something, so I grabbed a snowfall stencil and some texture paste and tried my best to work around the images and frames. Not my best move, haha. I was sweating a bit, but I think it worked out ok.

Thanks for stopping by! Check out the LF blog this morning for more projects - click!

♥.

Monday, November 12, 2018

Stay cool!

Hi there!

I'm here and on the Neat and Tangled blog this morning, with a card that features a set from our newest release, Stay Cool.

stay cool!

I started out by coloring the images that I wanted to feature: the little kid on the polar bear, and the ice-fishing kid. I colored their parkas and mittens in a neutral light brown (using copic markers E30, E31, and E33.)

stay cool!


I added warmth to the polar bear using light grey markers (W3, W1 and W00,) but I was very light-handed with the coloring. I left most of his body uncolored and just gave shadows where I thought they would be.

stay cool!

The ice-fisher found a present instead of a fish, and I also added a tiny snowman from Snow Fun as an extra cold-weather friend. I die-cut the COOL sentiment and colored it using a few light blue markers (B0000 and B00.)

For the background, I used a piece of Altenew's Nebula washi tape, and also grounded the image using a piece of their Golden Edge washi tape. I added some white enamel snow dots to the night-sky background to finish things off.

I hope you like it! Thanks for stopping by!

♥.